您现在的位置是:网站首页> 编程资料编程资料
Golang map实践及实现原理解析_Golang_
![]() 2023-05-26
394人已围观
2023-05-26
394人已围观
简介 Golang map实践及实现原理解析_Golang_
Map实践以及实现原理
使用实例内存模型创建maphash函数key定位和碰撞解决扩容元素访问删除迭代核心点:
使用实例
测试的主要目的是对于map,当作为函数传参时候,函数内部的改变会不会透传到外部,以及函数传参内外是不是一个map,也就是传递的是实例还是指针。(golang里面的传参都是值传递)。
Test Case1:传参为map。
func main(){ fmt.Println("--------------- m ---------------") m := make(map[string]string) m["1"] = "0" fmt.Printf("m outer address %p, m=%v \n", m, m) passMap(m) fmt.Printf("post m outer address %p, m=%v \n", m, m) } func passMap(m map[string]string) { fmt.Printf("m inner address %p \n", m) m["11111111"] = "11111111" fmt.Printf("post m inner address %p \n", m) }运行结果是:
--------------- m ---------------
m outer address 0xc0000b0000, m=map[1:0]
m inner address 0xc0000b0000
post m inner address 0xc0000b0000
post m outer address 0xc0000b0000, m=map[1:0 11111111:11111111]
从运行结果我们可以知道:
当传参为map的时候,其实传递的是指针地址。函数内外map的地址都是一样的。函数内部的改变会透传到函数外部。
Test Case2:Test Case1的实现其实也有个特殊使用例子,也就是当函数入参map没有初始化的时候。
func main(){ fmt.Println("--------------- m2 ---------------") var m2 map[string]string//未初始化 fmt.Printf("m2 outer address %p, m=%v \n", m2, m2) passMapNotInit(m2) fmt.Printf("post m2 outer address %p, m=%v \n", m2, m2) } func passMapNotInit(m map[string]string) { fmt.Printf("inner: %v, %p\n",m, m) m = make(map[string]string, 0) m["a"]="11" fmt.Printf("inner: %v, %p\n",m, m) }运行结果是:
--------------- m2 ---------------
m2 outer address 0x0, m=map[]
inner: map[], 0x0
inner: map[a:11], 0xc0000ac120
post m2 outer address 0x0, m=map[]
从结果可以看出,当入参map没有初始化的时候,就不一样了:
- 没有初始化的map地址都是0;
- 函数内部初始化map不会透传到外部map。
其实也好理解,因为map没有初始化,所以map的地址传递到函数内部之后初始化,会改变map的地址,但是外部地址不会改变。有一种方法,return 新建的map。
内存模型
我这边的源码版本是:go 1.13
Golang的map从high level的角度来看,采用的是哈希表,并使用链表查找法解决冲突。但是golang的map实现在链表解决冲突时候有很多优化,具体我们在后面看细节。
数据结构最能说明原理,我们先看map的数据结构:
// A header for a Go map. type hmap struct { //map 中的元素个数,必须放在 struct 的第一个位置,因为内置的 len 函数会通过unsafe.Pointer会从这里读取 count int flags uint8 // bucket的数量是2^B, 最多可以放 loadFactor * 2^B 个元素,再多就要 hashGrow 了 B uint8 //overflow 的 bucket 近似数 noverflow uint16 hash0 uint32 // hash seed //2^B 大小的数组,如果 count == 0 的话,可能是 nil buckets unsafe.Pointer // 扩容的时候,buckets 长度会是 oldbuckets 的两倍,只有在 growing 时候为空。 oldbuckets unsafe.Pointer // 指示扩容进度,小于此地址的 buckets 迁移完成 nevacuate uintptr // progress counter for evacuation (buckets less than this have been evacuated) // 当 key 和 value 都可以 inline 的时候,就会用这个字段 extra *mapextra // optional fields } 这里B是map的bucket数组长度的对数,每个bucket里面存储了kv对。buckets是一个指针,指向实际存储的bucket数组的首地址。 bucket的结构体如下:
type bmap struct { // tophash generally contains the top byte of the hash value // for each key in this bucket. If tophash[0] < minTopHash, // tophash[0] is a bucket evacuation state instead. tophash [bucketCnt]uint8 // Followed by bucketCnt keys and then bucketCnt elems. // NOTE: packing all the keys together and then all the elems together makes the // code a bit more complicated than alternating key/elem/key/elem/... but it allows // us to eliminate padding which would be needed for, e.g., map[int64]int8. // Followed by an overflow pointer. } 上面这个数据结构并不是 golang runtime 时的结构,在编译时候编译器会给它动态创建一个新的结构,如下:
type bmap struct { topbits [8]uint8 keys [8]keytype values [8]valuetype pad uintptr overflow uintptr } bmap 就是我们常说的“bucket”结构,每个 bucket 里面最多存储 8 个 key,这些 key 之所以会落入同一个桶,是因为它们经过哈希计算后,哈希结果是“一类”的。在桶内,又会根据 key 计算出来的 hash 值的高 8 位来决定 key 到底落入桶内的哪个位置(一个桶内最多有8个位置)。
这里引用网络上的一张图:
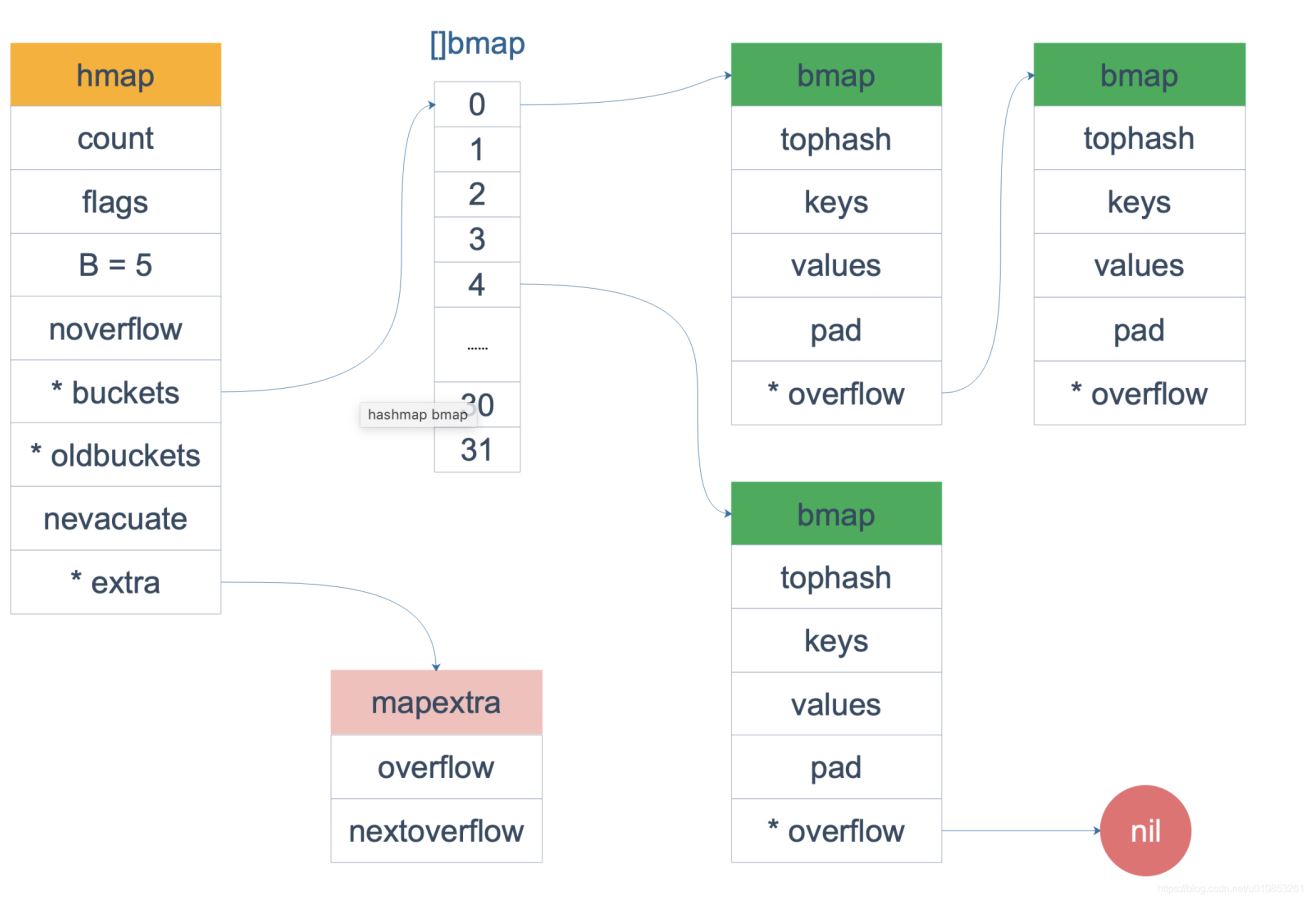
当 map 的 key 和 value 都不是指针,并且 size 都小于 128 字节的情况下,会把 bmap 标记为不含指针,这样可以避免 gc 时扫描整个 hmap。但是,我们看 bmap 其实有一个 overflow 的字段,是指针类型的,破坏了 bmap 不含指针的设想,这时会把 overflow 移动到 extra 字段来。
// mapextra holds fields that are not present on all maps. type mapextra struct { // If both key and elem do not contain pointers and are inline, then we mark bucket // type as containing no pointers. This avoids scanning such maps. // However, bmap.overflow is a pointer. In order to keep overflow buckets // alive, we store pointers to all overflow buckets in hmap.extra.overflow and hmap.extra.oldoverflow. // overflow and oldoverflow are only used if key and elem do not contain pointers. // overflow contains overflow buckets for hmap.buckets. // oldoverflow contains overflow buckets for hmap.oldbuckets. // The indirection allows to store a pointer to the slice in hiter. overflow *[]*bmap oldoverflow *[]*bmap // nextOverflow holds a pointer to a free overflow bucket. nextOverflow *bmap } bmap 是存放 k-v 的地方,我们看看bmap详细的存储分布细节:
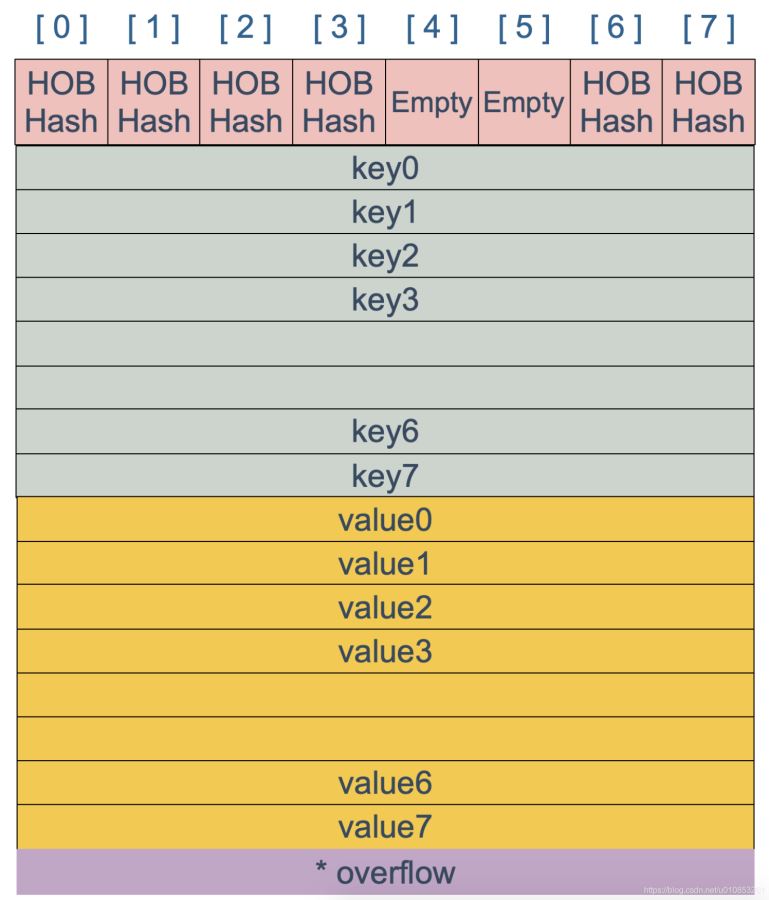
上图就是 bucket 的内存模型,HOB Hash 指的就是 top hash字段。我们可以看到bucket的kv分布分开的,没有按照我们常规的kv/kv/kv…这种。源码里说明这样的好处是在某些情况下可以省略掉 padding 字段,节省内存空间。
比如: map[int64]int8
如果按照 key/value/key/value/… 这样的模式存储,那在每一个 key/value pair 之后都要额外 padding 7 个字节;而将所有的 key,value 分别绑定到一起,这种形式 key/key/…/value/value/…,则只需要在最后添加 padding。
每个 bucket 设计成最多只能放 8 个 key-value 对,如果有第 9 个 key-value 落入当前的 bucket,那就需要再构建一个 bucket ,通过 overflow 指针连接起来。
创建map
map的创建非常简单,比如下面的语句:
m := make(map[string]string) // 指定 map 长度 m := make(map[string]string, 10)
make函数实际上会被编译器定位到调用 runtime.makemap(),主要做的工作就是初始化 hmap 结构体的各种字段,例如计算 B 的大小,设置哈希种子 hash0 等等。
// 这里的hint就是我们 make 时候后面指定的初始化长度. func makemap(t *maptype, hint int, h *hmap) *hmap { //......省略各种检查的逻辑 // 找到一个 B,使得 map 的装载因子在正常范围内。 B := uint8(0) for overLoadFactor(hint, B) { B++ } h.B = B // 初始化 hash table // 如果 B 等于 0,那么 buckets 就会在赋值的时候再分配 // 如果长度比较大,分配内存会花费长一点 if h.B != 0 { var nextOverflow *bmap h.buckets, nextOverflow = makeBucketArray(t, h.B, nil) if nextOverflow != nil { h.extra = new(mapextra) h.extra.nextOverflow = nextOverflow } } return h } 注意,这个函数返回的结果:*hmap 是一个指针,而我们之前讲过的 makeslice 函数返回的是 Slice 结构体对象。这也是 makemap 和 makeslice 返回值的区别所带来一个不同点:当 map 和 slice 作为函数参数时,在函数参数内部对 map 的操作会影响 map 自身;而对 slice 却不会(之前讲 slice 的文章里有讲过)。
主要原因:一个是指针(*hmap),一个是结构体(slice)。Go 语言中的函数传参都是值传递,在函数内部,参数会被 copy 到本地。*hmap指针 copy 完之后,仍然指向同一个 map,因此函数内部对 map 的操作会影响实参。而 slice 被 copy 后,会成为一个新的 slice,对它进行的操作不会影响到实参。
hash函数
关于hash函数的细节,这里就不介绍了。这里需要重点提示的是,哈希函数的算法与key的类型一一对应的。根据 key 的类型, maptype结构体的 key字段的alg 字段会被设置对应类型的 hash 和 equal 函数。
key定位和碰撞解决
对于 hashmap 来说,最重要的就是根据key定位实际存储位置。key 经过哈希计算后得到哈希值,哈希值是 64 个 bit 位(针对64位机)。根据hash值的最后B个bit位来确定这个key落在哪个桶。如果 B = 5,那么桶的数量,也就是 buckets 数组的长度是 2^5 = 32。
suppose,现在有一个 key 经过哈希函数计算后,得到的哈希结果是:
10010111 | 000011110110110010001111001010100010010110010101010 │ 01010
用最后的 5 个 bit 位,也就是 01010,值为 10,也就是 10 号桶。这个操作实际上就是取余操作,但是取余开销太大,所以代码实现上用的位操作代替。
再用哈希值的高 8 位,找到此 key 在 bucket 中的位置,这是在寻找已有的 key。最开始桶内还没有 key,新加入的 key 会找到第一个空位,放入。
buckets 编号就是桶编号,当两个不同的 key 落在同一个桶中,也就是发生了哈希冲突。冲突的解决手段是用链表法:在 bucket 中,从前往后找到第一个空位。这样,在查找某个 key 时,先找到对应的桶,再去遍历 bucket 中的 key。
下面是检索的示意图:
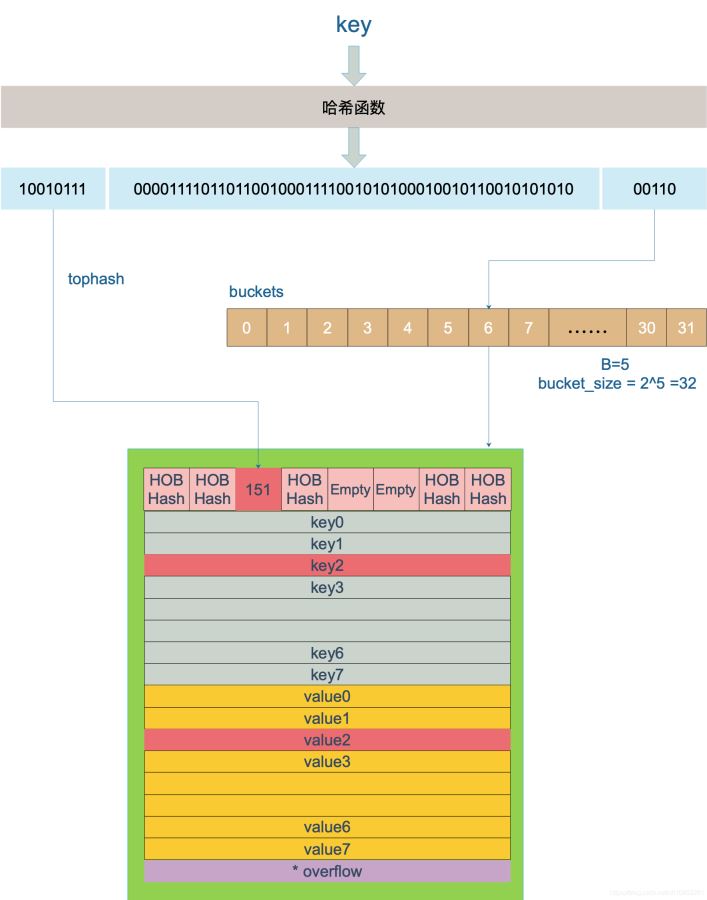
上图中,假定 B = 5,所以 bucket 总数就是 2^5 = 32。首先计算出待查找 key 的哈希,使用低 5 位 00110,找到对应的 6 号 bucket,使用高 8 位 10010111,对应十进制 151,在 6 号 bucket 中 遍历bucket 寻找 tophash 值(HOB hash)为 151 的 key,找到了 2 号槽位,这样整个查找过程就结束了。
如果在 bucket 中没找到,并且 overflow 不为空,还要继续去 overflow bucket 中寻找,直到找到或是所有的 key 槽位都找遍了,包括所有的 overflow bucket。(这里需要遍历bucket数组中某个槽位的bucket链表的所有bucket)
下面我们通过源码验证:
// mapaccess1 returns a pointer to h[key]. Never returns nil, instead // it will return a reference to the zero object for the elem type if // the key is not in the map. func mapaccess1(t *maptype, h *hmap, key unsafe.Pointer) unsafe.Pointer { //......校验逻辑 //如果 h 什么都没有,返回value类型的零值 if h == nil || h.count == 0 { if t.hashMightPanic() { t.key.alg.hash(key, 0) // see issue 23734 } return unsafe.Pointer(&zeroVal[0]) } // 并发写冲突 if h.flags&hashWriting != 0 { throw("concurrent map read and map write") } // 不同类型 key 使用的 hash 算法在编译期确定 alg := t.key.alg hash := alg.hash(key, uintptr(h.hash0)) // 求低 B 位的掩码. // 比如 B=5,那 m 就是31,低五位二进制是全1 m := bucketMask(h.B) // b 就是 当前key对应的 bucket 的地址 b := (*bmap)(add(h.buckets, (hash&m)*uintptr(t.bucketsize))) // oldbuckets 不为 nil,说明发生了扩容 if c := h.oldbuckets; c != nil { if !h.sameSizeGrow() { // There used to be half as many buckets; mask down one more power of two. m >>= 1 } // 求出 key 在老的 map 中的 bucket 位置 oldb := (*bmap)(add(c, (hash&m)*uintptr(t.bucketsize))) // 如果 oldb 没有搬迁到新的 bucket // 那就在老的 bucket 中寻找 if !evacuated(oldb) { b = oldb } } // 计算出高 8 位的 hash // 相当于右移 56 位,只取高8位 top := tophash(hash) // 这里进入bucket的二层循环找到对应的kv(第一层是bucket,第二层是bucket内部的8个slot) bucketloop: // 遍历bucket以及overflow链表 for ; b != nil; b = b.ov
相关内容
- go中import包的大坑解决方案_Golang_
- windows下使用GoLand生成proto文件的方法步骤_Golang_
- GoLand一键上传项目到远程服务器的方法步骤_Golang_
- GoLand利用plantuml生成UML类图_Golang_
- GO项目配置与使用的方法步骤_Golang_
- goland 实现websocket server的示例代码_Golang_
- 一文理解Goland协程调度器scheduler的实现_Golang_
- 深入了解Go的interface{}底层原理实现_Golang_
- Go语言使用对称加密的示例详解_Golang_
- go语言中slice,map,channl底层原理_Golang_
点击排行
本栏推荐


